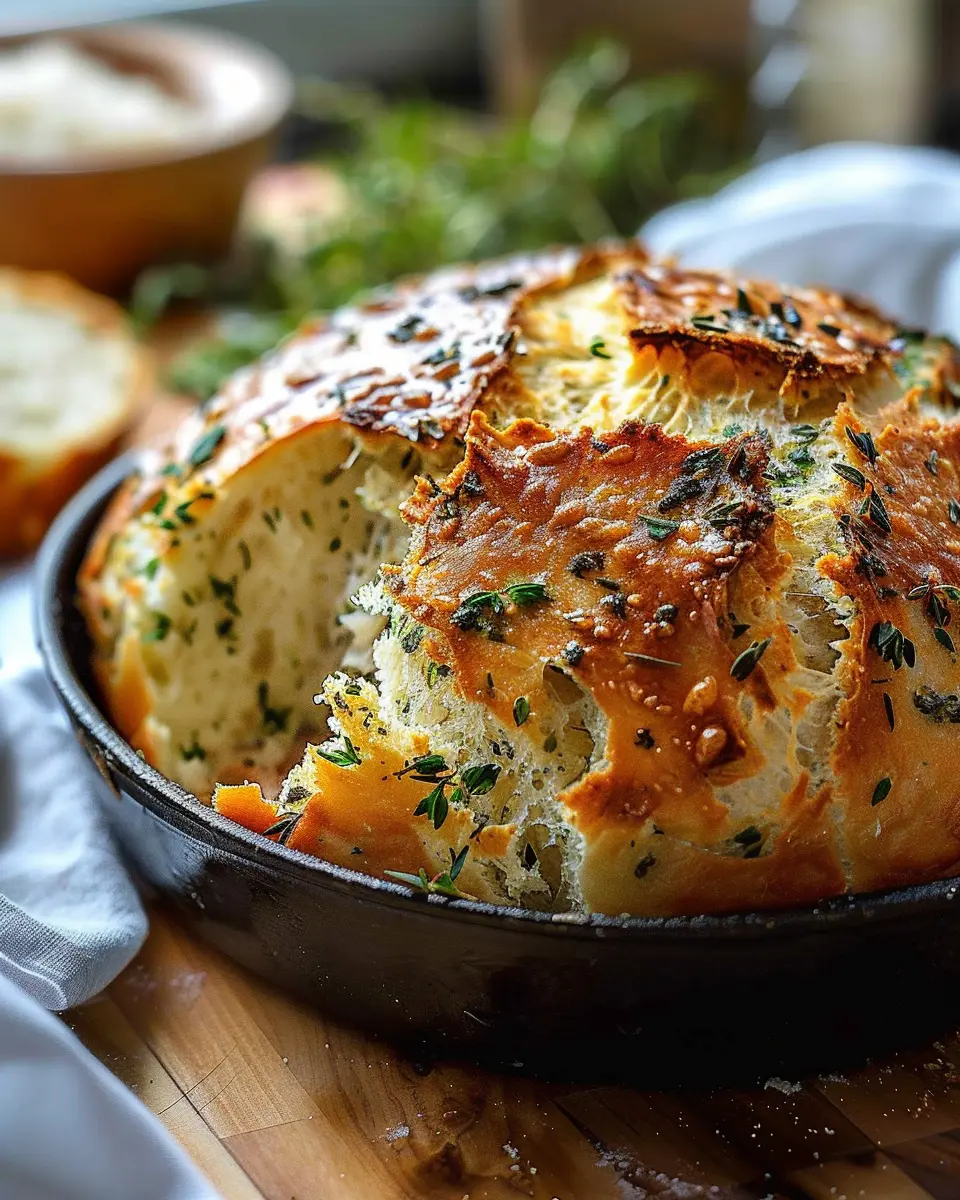
Introduction to Garlic Herb Dutch Oven Bread
There’s something truly magical about the scent of homemade bread wafting through your kitchen. It’s not just about the taste; it’s an experience that invites you into the art of cooking. While store-bought options have their place, nothing quite compares to the satisfaction of pulling a freshly baked loaf from your oven, especially when that loaf is Garlic Herb Dutch Oven Bread.
Why Homemade Bread Is Worth the Effort
Making your own bread may seem daunting, especially with the busy lives we lead today. However, the reward far outweighs the effort. Studies show that engaging in cooking can lead to improved mental well-being—who wouldn’t want a tasty endorphin boost? Bread-making allows you to control the ingredients, ensuring a healthier option tailored to your tastes. Plus, it’s a fantastic way to impress friends at your next gathering.
When you use a Dutch oven, magical things happen. This method creates a steam-filled environment that’s crucial for developing a crusty exterior while keeping the inside soft and fluffy. If you’re looking for tips, check out resources from reputable sites like King Arthur Baking or Serious Eats for bread-making techniques that bring out the best in your ingredients.
Plus, think about how versatile Garlic Herb Dutch Oven Bread can be. Imagine pairing it with homemade soups, savory spreads, or your favorite gourmet cheeses. Not only does it enhance your meals, but a warm loaf straight from the oven can also create a cozy atmosphere, perfect for gatherings or a comforting night in.
And let’s not forget about the aromas! Your kitchen will smell fantastic as the garlic and herbs meld together during the baking process, making it hard for anyone to resist sneaking a piece as it cools. So, whether you’re a seasoned baker or a novice looking to try something new, this bread recipe promises not just delightful flavors but also an experience worth savoring.
In the following sections, we’ll dive into the specific steps to create your very own Garlic Herb Dutch Oven Bread, ensuring it’s an endeavor you’ll want to replicate time and again. Stick around! You won’t regret it.
Ingredients for Garlic Herb Dutch Oven Bread
Dry ingredients
To create your Garlic Herb Dutch Oven Bread, start with the essential dry ingredients that lay the foundation for a perfect loaf. You’ll need:
- All-purpose flour: 3 cups provides structure and chewiness.
- Salt: 1 ½ teaspoons enhances flavor and strengthens gluten.
- Yeast: 2 teaspoons active dry yeast gives that delightful rise.
- Sugar: 1 tablespoon (preferably granulated) feeds the yeast for a fluffy texture.
These ingredients play a critical role in achieving that crusty, golden exterior and soft interior. Using quality flour can make a noticeable difference, so consider brands that are highly rated like King Arthur Flour.
Wet ingredients and flavorings
Now, let’s bring in the wet ingredients and flavorings that add the oomph to your Garlic Herb Dutch Oven Bread:
- Water: 1 ½ cups, warmed to about 110°F, activates the yeast.
- Olive oil: 2 tablespoons adds moisture and richness.
- Garlic: 4 to 5 cloves, minced, for that aromatic kick.
- Fresh herbs: A mix of rosemary and thyme (about 2 tablespoons total) elevates the flavor profile like nothing else.
Gather these ingredients, and you’re ready to whip up something superb. Interested in exploring more bread-making techniques? Check out resources from King Arthur Baking or Breadtopia for tips and techniques that will elevate your baking game!
Preparing Garlic Herb Dutch Oven Bread
Creating the perfect Garlic Herb Dutch Oven Bread in your kitchen is not just about mixing ingredients; it’s a delightful journey filled with enticing aromas and satisfying textures. Whether you’re a newbie baker or a seasoned pro, this recipe will elevate your bread-making game. Let’s dive into the steps!
Mix the dry ingredients
To start, gather your dry ingredients, which form the foundation of your dough. You’ll need:
- 3 cups all-purpose flour
- 1 teaspoon salt
- 1 teaspoon sugar
- 1 teaspoon dried oregano
- 1 teaspoon dried basil
- 1/2 teaspoon garlic powder
- 1/4 teaspoon instant yeast
In a large mixing bowl, whisk these ingredients together until they are well combined. The combination of herbs not only adds flavor but also transforms your bread into a fragrant delight that reminds you of cozy evenings in a rustic kitchen.
Combine wet ingredients and flavors
Next, it’s time to bring some moisture into the mix. In a separate bowl, combine:
- 1 1/4 cups warm water (about 110°F)
- 2 tablespoons olive oil
- 2 cloves garlic, minced
Stir the garlic oil mixture gently, allowing the flavors to meld together. Garlic adds a punch that, when baked, becomes beautifully aromatic—a true game-changer for any Garlic Herb Dutch Oven Bread. Don’t hesitate to experiment with additional herbs or even cheese if you’d like to amplify the flavor even further!
Allow the dough to rest
Now, it’s time to marry the dry and wet ingredients. Pour the wet mixture into the bowl with the dry ingredients. Mix with a wooden spoon until everything is just combined. At this point, the dough will look a bit shaggy and messy, and that’s perfectly okay!
Cover the bowl with a clean kitchen towel or plastic wrap, and let it rest for at least 12 hours (or up to 18 hours for even better flavor). This slow fermentation process not only develops the gluten but also enhances the taste significantly. It’s like giving your bread the gift of time!
Preheat the oven and prepare the Dutch oven
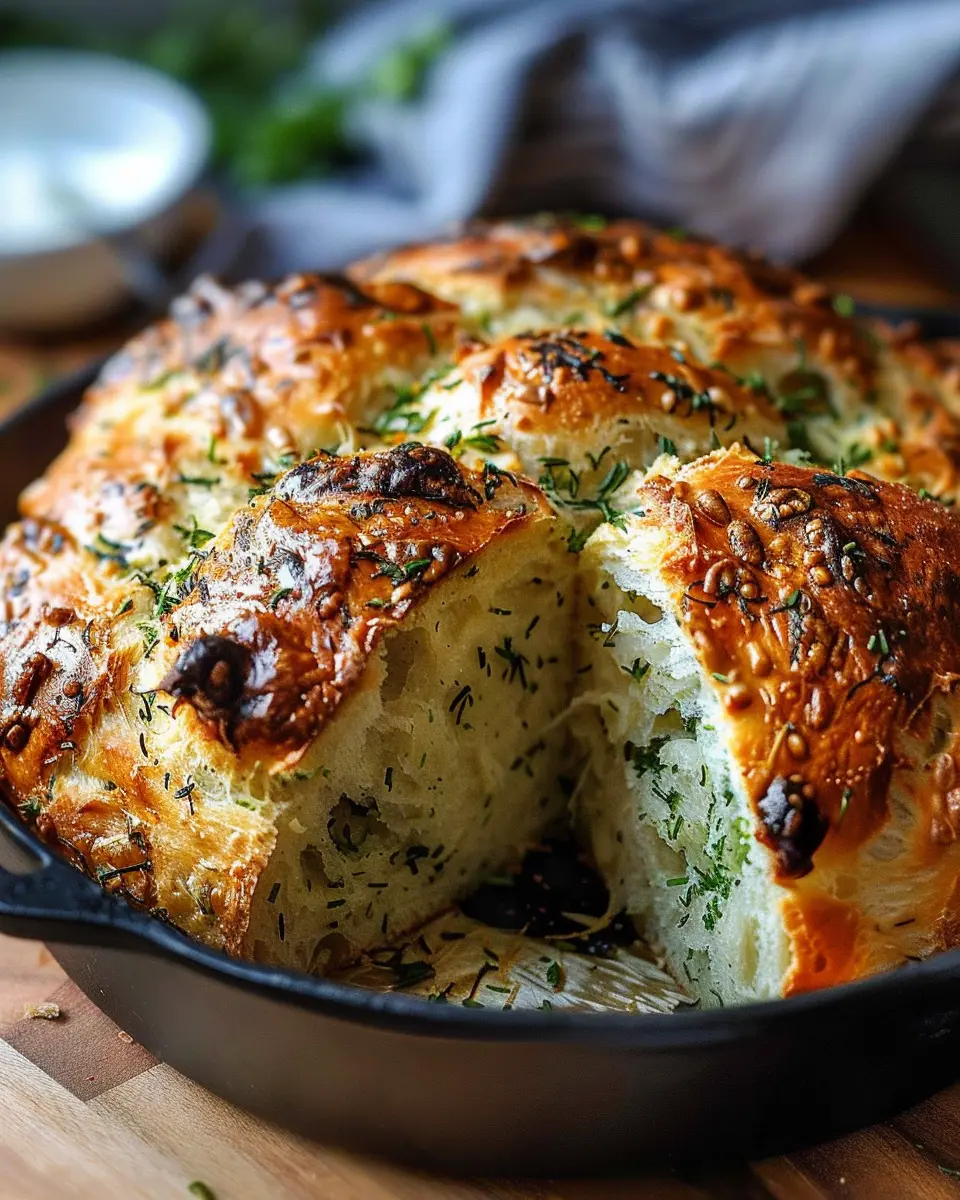
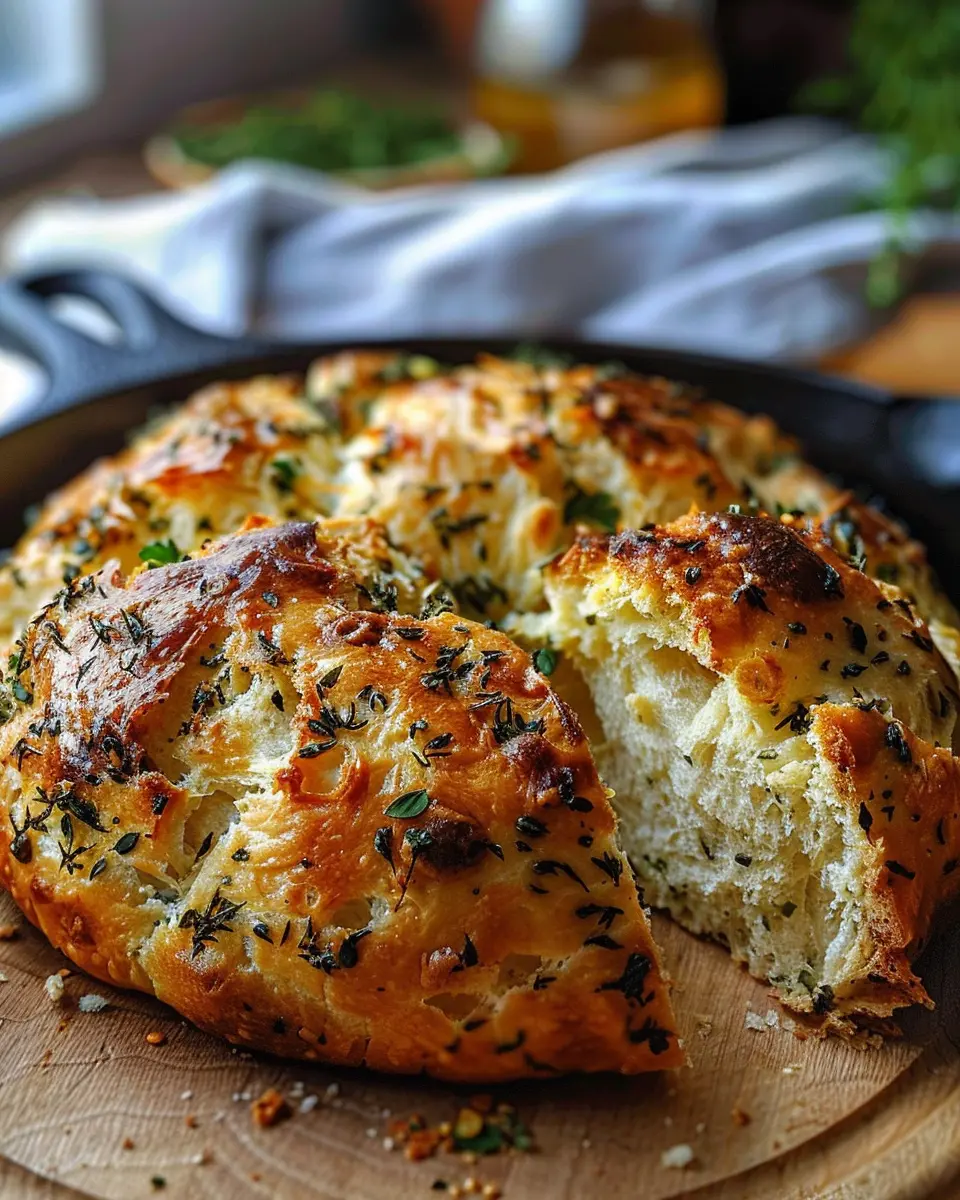
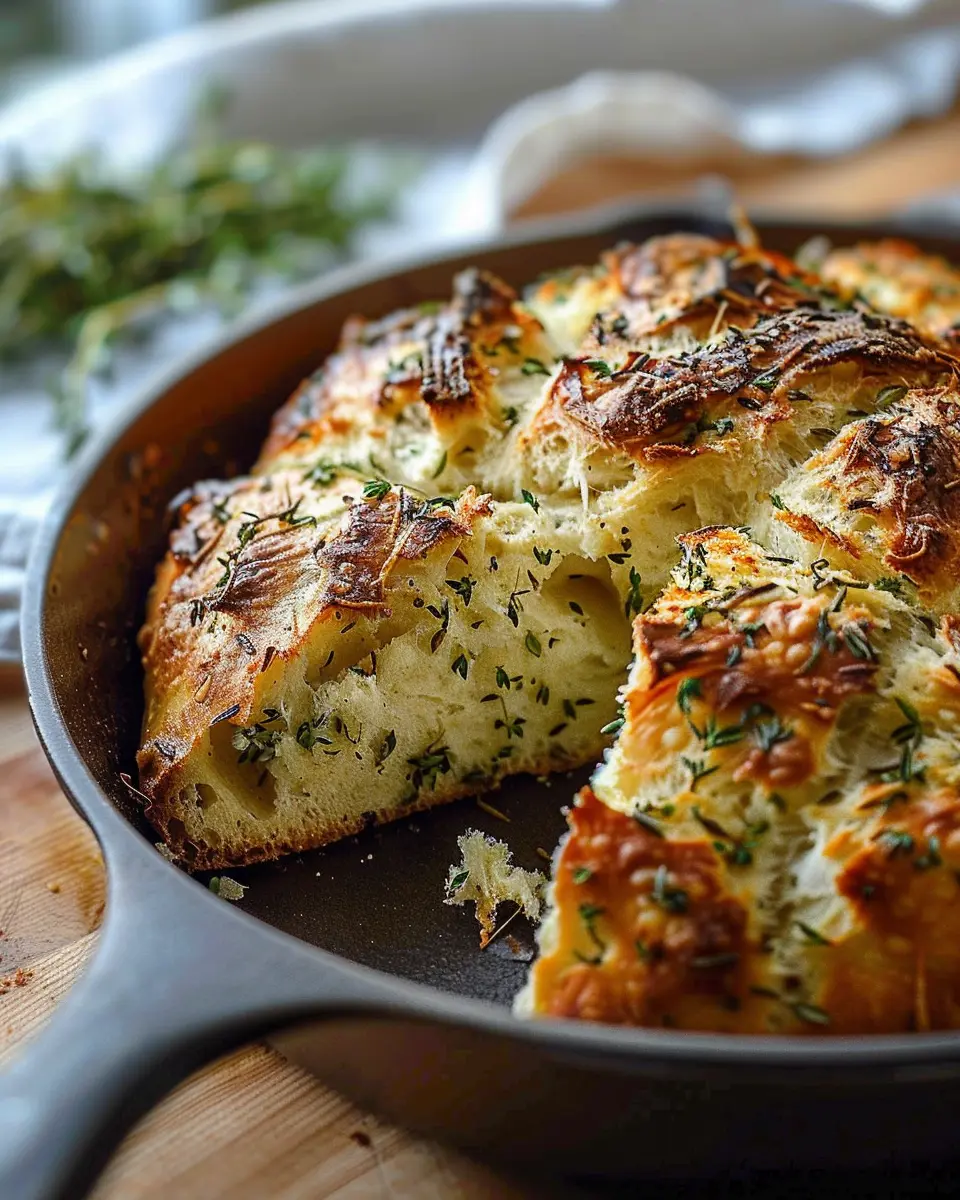
Once the dough has rested and you can almost smell the deliciousness, it’s time to prep for baking. Preheat your oven to 450°F and place your Dutch oven (with the lid on) in the oven to heat up. This ensures a crisp crust that every bread lover craves.
While the oven heats, flour your countertop and gently transfer your dough onto it. It may seem sticky, so don’t be shy with the flour. Shape the dough into a round loaf, being careful not to overwork it, because that will keep your bread fluffy and light.
Shape the dough and bake the bread
After shaping your loaf, carefully remove the hot Dutch oven from your oven (don’t forget to use pot holders!) and lightly coat the bottom with olive oil to prevent sticking. Place the dough inside—this is where the magic happens!
Cover with the lid and bake for 30 minutes. Then, remove the lid and bake for an additional 15 to 20 minutes, until the top is golden brown and crusty. The enticing aroma that fills your kitchen during this time is simply unbeatable.
Once done, let it cool for a few minutes, slice, and enjoy your homemade Garlic Herb Dutch Oven Bread with a dollop of butter or your favorite spread. Trust me, this bread will quickly become a staple in your home!
If you’d like to delve deeper into why bread rises and how yeast works, consider checking out resources like King Arthur Baking for more insights. Happy baking!
Variations on Garlic Herb Dutch Oven Bread
If you love the classic flavors of Garlic Herb Dutch Oven Bread, you’re in for a treat! This recipe is incredibly versatile, allowing you to customize it to suit your taste. Let’s explore some fun variations that will elevate your baking game.
Adding Different Herbs
While garlic and herbs typically shine in this recipe, why not mix it up? Consider adding thyme, rosemary, or even a hint of oregano for a Mediterranean twist. Fresh herbs work wonders, but if you only have dried herbs on hand, feel free to use those. Try mixing in about a tablespoon of your favorite herb blend—your kitchen will smell amazing!
Incorporating Cheese or Other Flavors
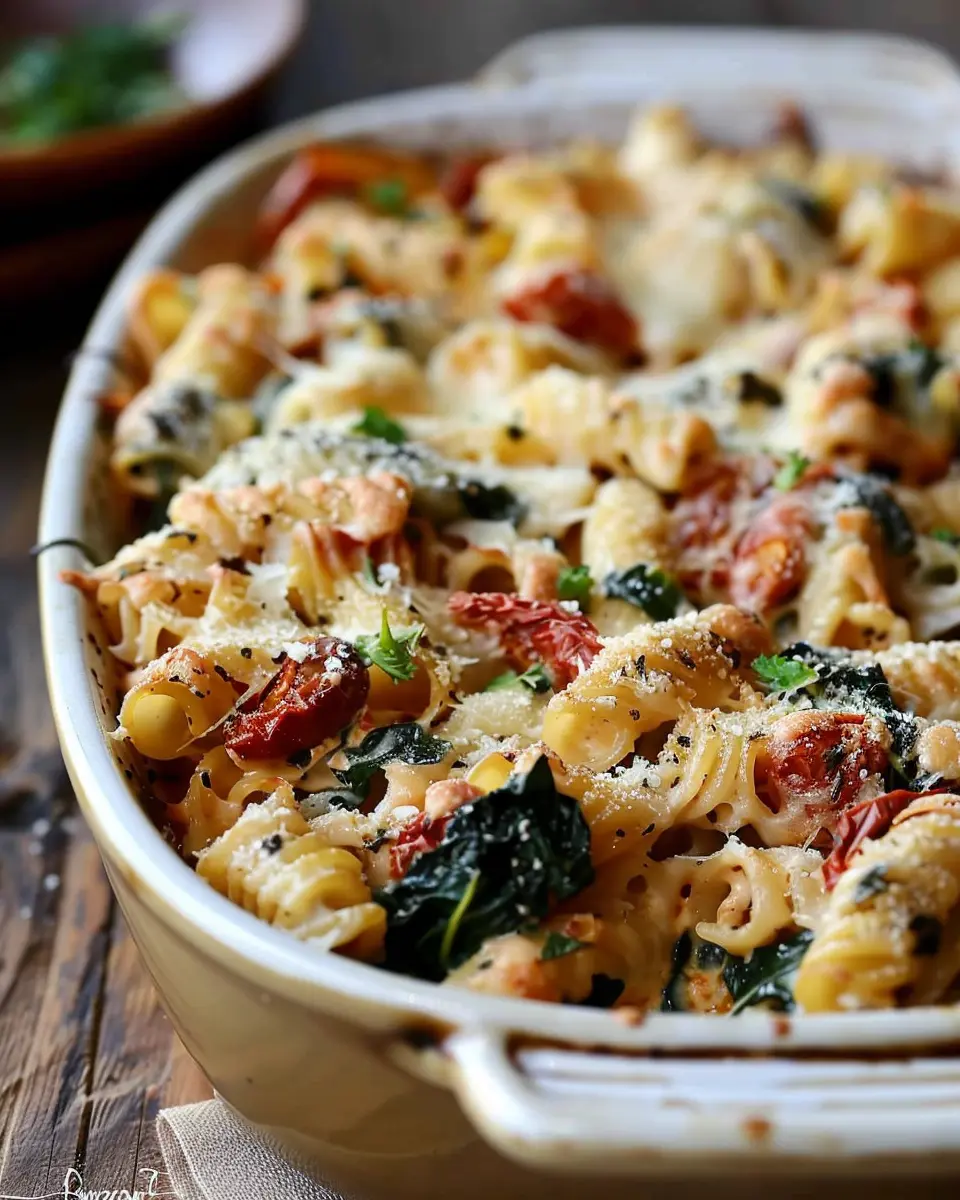
Cheese lovers can take this Garlic Herb Dutch Oven Bread to the next level. Adding shredded cheese, such as cheddar or parmesan, in the dough gives it a rich, savory profile. For an extra layer of flavor, why not try adding some sautéed onions or roasted red peppers? You can also opt for crunchy elements like sun-dried tomatoes or diced Turkey Bacon—who doesn’t appreciate that little touch of indulgence?
Want a unique texture? Experiment with whole grains or nuts in your dough. These additions not only enhance the flavor but also give the bread a wholesome twist.
These variations ensure that every loaf you bake can be a new experience. So, roll up your sleeves, and get creative! For more tips on baking delicious artisan bread, check out resources like King Arthur Baking or The Fresh Loaf. Happy baking!
Cooking Tips and Notes for Garlic Herb Dutch Oven Bread
The Importance of Resting Time
Resting dough may seem optional, but it’s actually a crucial step in crafting the perfect Garlic Herb Dutch Oven Bread. When you let the dough rest for 30 minutes to an hour, you allow the glutens to relax, leading to a more tender crumb. Plus, it gives the flavors a chance to develop, enhancing the overall taste. Think of this time as a mini-vacation for your dough—important for both texture and flavor!
Tips for Achieving the Perfect Crust
A delicious crust can elevate your Garlic Herb Dutch Oven Bread from good to spectacular! Here are some tips to get that golden, crunchy exterior:
- Preheat the Dutch oven: Place your Dutch oven in the oven while it preheats to around 450°F. This creates a steamy environment that’s perfect for crust development.
- Use steam: You can add a few ice cubes to the pot during the first few minutes of baking or cover the pot with the lid to trap moisture.
- Bake at the right temperature: While the initial high temp is important for crust formation, lower it slightly halfway through the baking time to ensure even cooking.
Embrace these techniques, and you’ll be well on your way to savoring a heavenly loaf of bread. For more insights, check out King Arthur Baking for expert tips!
Serving suggestions for Garlic Herb Dutch Oven Bread
Pairing with soups and salads
There’s nothing quite like a warm slice of Garlic Herb Dutch Oven Bread to elevate your meal! This versatile bread pairs beautifully with a variety of dishes. Think about enjoying it with:
- Creamy Tomato Soup: The richness of the soup complements the garlicky notes in the bread.
- Minestrone Soup: A hearty vegetable soup pairs perfectly with the bread’s flavor, making for a satisfying dinner.
- Crisp Caesar Salad: The crunchy greens and tangy dressing contrast wonderfully with the soft, buttery texture of the slices.
Want to take it up a notch? Serve your Garlic Herb Dutch Oven Bread with homemade dips like hummus or a spinach yogurt dip. It adds a delightful twist and makes for a fantastic appetizer during gatherings!
Creative uses for leftover bread
If you find yourself with extra Garlic Herb Dutch Oven Bread, don’t let it go to waste! Here are some creative ways to use it:
- Croutons: Cube the bread, toss with olive oil and seasoning, and bake until crispy. Perfect for soups and salads!
- Bread Pudding: Transform stale bread into a sweet or savory pudding that’s comforting and delicious.
- Bruschetta: Top toasted slices with fresh tomatoes, basil, and a drizzle of balsamic glaze for a simple appetizer.
Not only do these suggestions minimize food waste, but they also maximize the buttery, herby flavors that make this bread so divine. For more ideas, check out resources on food preservation to reduce waste and enjoy your leftovers creatively!
Time breakdown for Garlic Herb Dutch Oven Bread
When you’re ready to bake, knowing your time breakdown can make all the difference. Here’s how it stacks up for this delightful Garlic Herb Dutch Oven Bread.
Preparation time
You’ll need about 15 minutes to gather your ingredients and mix the dough. It’s a straightforward process—just combine flour, yeast, salt, and those aromatic garlic and herb infusions.
Cooking time
Baking in the Dutch oven takes approximately 45 minutes. This step allows the bread to develop that perfect crust while keeping the inside soft and airy.
Total time
In total, you’re looking at around 1 hour of hands-on time. Set aside an additional 30 minutes for the dough to rest and rise. Ready to impress your friends with homemade bread? Check out The Kitchn for some tips on mastering that golden crust!
Nutritional Information for Garlic Herb Dutch Oven Bread
When you’re whipping up a delicious batch of Garlic Herb Dutch Oven Bread, it’s essential to consider its nutritional profile. This bread, filled with garlic and herbs, not only tantalizes your taste buds but also fits beautifully into a balanced diet.
Calories
A serving of this bread typically contains approximately 180 calories. It’s a satisfying treat that pairs well with various meals without piling on too many extra calories.
Protein
In terms of protein, Garlic Herb Dutch Oven Bread offers around 6 grams per serving. While not a primary protein source, it can complement your protein-rich meals quite nicely, especially when served alongside options like chicken or turkey bacon.
Dietary Options
If you’re concerned about dietary restrictions, the good news is that this bread can cater to various preferences. Here are some options:
- Vegetarian and Vegan-Friendly: Easily make this recipe dairy-free by using almond or oat milk.
- Gluten-Free Alternative: Substitute regular flour with gluten-free flour to enjoy a gluten-friendly version.
For a deeper dive into nutrition tailored to various dietary needs, check out sources like the American Heart Association or EatRight.org.
Incorporating this Garlic Herb Dutch Oven Bread into your meals can be both nourishing and delightful. Enjoy it fresh from the oven, and feel good knowing it’s a wholesome addition to your dining experience!
FAQs about Garlic Herb Dutch Oven Bread
How do I know when the bread is done?
Determining the perfect moment to pull your Garlic Herb Dutch Oven Bread out of the oven can be a game-changer. A good rule of thumb is to check for a deep golden-brown crust. You can also do a quick tap test; if it sounds hollow when you lightly tap the bottom, it’s a sure sign your bread is ready. Using a food thermometer can also help—aim for an internal temperature of about 200°F (93°C).
Can this recipe be doubled or halved?
Absolutely! The beauty of this Garlic Herb Dutch Oven Bread recipe is its flexibility. If you’re in the mood for a larger batch—perhaps for a gathering—feel free to double the ingredients. Just ensure your Dutch oven is large enough to accommodate the dough. Conversely, halving the recipe is also straightforward. Just keep an eye on baking times, as smaller loaves may cook faster.
What is the best way to store the bread?
Storing your freshly baked Garlic Herb Dutch Oven Bread properly will help maintain its delightful texture and flavor. Allow the bread to cool completely before wrapping it in a clean kitchen towel or placing it in a paper bag, which helps it breathe. If you want to keep it for longer, consider slicing the bread and freezing it in an airtight container. When you’re ready to enjoy it again, simply toast it or warm it in the oven!
For more tips on bread preservation, you can check out this helpful guide from the Bread Baker’s Guild of America. Happy baking!
Conclusion on Garlic Herb Dutch Oven Bread
Baking your own Garlic Herb Dutch Oven Bread at home is not just rewarding; it’s a delightful experience! The aroma of freshly baked bread, mixed with the savory scent of garlic and herbs, creates an inviting atmosphere in your kitchen. Plus, there’s something incredibly satisfying about pulling a golden loaf from the oven, knowing you crafted it yourself.
Don’t hesitate to dive into your baking journey. With a few ingredients and a bit of patience, you can conquer the art of bread-making. For more tips and recipes, check out resources like King Arthur Baking or Food Network for inspiration. Happy baking!
PrintGarlic Herb Dutch Oven Bread: Easy, Rustic, and Flavorful Delight
A simple and delicious recipe for Garlic Herb Dutch Oven Bread that brings out rustic flavors with fragrant herbs.
- Prep Time: 15 minutes
- Cook Time: 45 minutes
- Total Time: 18 hours
- Yield: 1 loaf 1x
- Category: Bread
- Method: Baking
- Cuisine: American
- Diet: Vegetarian
Ingredients
- 3 cups all-purpose flour
- 1 1/2 teaspoons salt
- 1 teaspoon dried oregano
- 1 teaspoon dried thyme
- 1/4 teaspoon garlic powder
- 1/4 teaspoon black pepper
- 1/4 teaspoon instant yeast
- 1 1/2 cups warm water
Instructions
- In a large bowl, mix the flour, salt, oregano, thyme, garlic powder, pepper, and yeast.
- Add warm water and stir until combined; dough will be shaggy.
- Cover the bowl with plastic wrap and let it rest at room temperature for 12 to 18 hours.
- Preheat the oven to 450°F (230°C) and place a Dutch oven inside to heat.
- Turn the dough out onto a floured surface, shape it into a ball, and let it rest for 30 minutes.
- Carefully remove the hot Dutch oven, place the dough inside, cover, and bake for 30 minutes.
- Uncover and bake for another 15 minutes until golden brown.
- Let it cool on a wire rack before slicing.
Notes
- Use fresh herbs for an even more vibrant flavor.
- Experiment with different types of flour for varied textures.
Nutrition
- Serving Size: 1 slice
- Calories: 130
- Sugar: 0g
- Sodium: 300mg
- Fat: 1g
- Saturated Fat: 0g
- Unsaturated Fat: 1g
- Trans Fat: 0g
- Carbohydrates: 25g
- Fiber: 1g
- Protein: 4g
- Cholesterol: 0mg
Keywords: Garlic Herb Dutch Oven Bread, rustic bread, easy bread recipe